Senteon Overview
Welcome to the documentation for Senteon's Security Configuration Management solution. Basic terminology/concepts and operating system support details are listed below.
Senteon recommends reading the sections below for key concepts and setup instructions if it is your first time using the solution.
Before You Begin
Terminology
| Term | Description |
|---|---|
| Senteon Command Center | Senteon’s web-based central management console (https://app.senteon.co) |
| Senteon Agent | A small program installed on each endpoint. It performs actions, monitors, and communicates back to the Senteon App Server |
| Senteon App Server | Senteon's front-end which provides the following: - Website for Command Center - Communication between Command Center and Agent(s) - Authentication/Authorization services - Processing assistance for endpoint evaluation |
| Senteon Update CDN | The CDN that delivers updates to Senteon Agent. |
| Organization | The container for all of your users, data, and resources. |
| Tenant | A container that represents an organization or part of an organization that Senteon users are responsible for managing the endpoints of. Senteon Agents are registered to a single Tenant and can be administered through the Tenant Console. |
| Organization Role | Determines the level of authorization a Senteon User has within the Organization. Users can be assigned a single Organization Role. |
| Tenant Permissions | Determines the level of authorization a Senteon User has within a specific Tenant. Users can be assigned a single permission set for 0 to many Tenants. |
Senteon Data Structure / Multi-Tenancy

Senteon Command Center - Supported Browsers
- Google Chrome (Version 103 or higher)
- Microsoft Edge (Version 103 or higher)
- Mozilla Firefox (Version 102 or higher)
Senteon Agent - Supported OS Versions
- Windows 10 Version 2004+
- Editions: Pro and Enterprise (Home not supported)
Senteon Command Center First-Time Setup
WARNING: Creating a new Organization will give your account the Owner role. This role has FULL CONTROL of the Organization and access to the account should be heavily restricted/monitored. After setup, we recommend that you invite/create a separate user with the User role and assign Tenant Permissions as needed for day-to-day operations of Senteon. This will help limit the potential risk of an account takeover due to stolen web sessions, etc. that are not entirely within our control
Step 0: Create a Senteon Account
1) Go to https://app.senteon.co
2) Click "Sign Up" and create your account
3) Verify your email
Step 1: Create or Join an Organization
1) After creating an account and accessing Command Center, you can either create a new Organization or accept an invite to an existing Organization.
Note: Your account will be associated with the Organization and you will automatically be directed to it on subsequent logins.
Step 2: Create a Tenant
1) Login to Command Center with an account that has Admin or Owner role in the Organization.
2) Navigate to Tenants > Overview and click the New Tenant button
3) Enter a name for the Tenant and click the Create Tenant button.
Step 3: Obtain Senteon Agent Installer / Script
1) Navigate to the dashboard for your new Tenant by going to Tenants > <Tenant Name>
2) Click the Install Agents button
3) Click the Generate Code button to create a Registration Code for installation.
Note: If you lose/forget a Registration Code, a new one can be generated but all previous codes for the Tenant will become obsolete
4) Choose Agent Installation Method:
-
Option 1: Quick Install PowerShell Script - Generates a PowerShell script with all of the information pre-loaded that, upon running, will download the installer to a temp folder on the C:\ drive and install the Agent.
-
Option 2: Manual GUI/Desktop Install - Use the Organization ID, Tenant ID, and Registration Code provided in the console to install Senteon Agent manually onto an Endpoint using the desktop installer.
Step 4: Install Senteon Agent(s)
To install you will need:
- An account with Administrator privileges on the endpoint to install Senteon Agent
-
Senteon Install Info
Organization ID- ID/Name of your OrganizationTenant ID- ID/Name of the Tenant you wish to register the agent/endpoint toRegistration Code- Registration code for Tenant
Note: All of these were provided by Command Center in Step 3
Quick Installation (PowerShell Script)
To download and install an Agent in a single command, utilize the script provided by Command Center in Step 3 option 2
Note: This script assumes that you wish to install to the C: Drive. For installing to a custom drive, see CLI Installation
A copy of the script without Organization ID, Tenant ID, or Registration Code filled in can be found below.
cd C:\Windows\Temp; wget update.senteon.co/installers/SenteonAgent.msi -UseBasicParsing -OutFile SenteonAgent.msi; msiexec /i "SenteonAgent.msi" /quiet ORGANIZATION="<Organization ID>" TENANT="<Tenant ID>" REGISTRATIONCODE="<Registration Code>" ACCEPTALL=YES /l*v "SenteonInstall.log"
Note: If a TenantID has any spaces, add a gravemarker (`) before the space to make PowerShell interpret it correctly
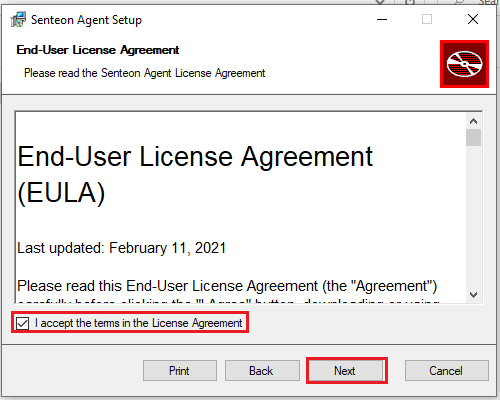
GUI/Desktop Installation
1) Download/transfer SenteonAgent.msi onto the endpoint you want to manage and execute (i.e. double-click).
2) Review and Accept the Senteon End-User License Agreement, then select Next.
3) Choose the folder where you want to install (C:\Program Files\Senteon\SenteonAgent by default)
4) Enter the requested details for the Tenant you wish to register the endpoint to.
5) Accept the UAC prompt that appears in the taskbar.

Command-Line Installation
Senteon Agent can be installed using MsiExec. All additional non-Senteon specific flags can be found in MsiExec's documentation. The Senteon recommended install command flags can be found below.
Install Flags
| Flag | Description |
|---|---|
| /i | Install with the following msi file |
| /quiet | Silent install without the GUI. Recommended for installs using RMM tools or SCCM |
| ORGANIZATION= | Specifies your Organization |
| TENANT= | Specifies the Tenant the Agent/Endpoint will be registered to |
| REGISTRATIONCODE= | Specifies the Registration Code of the Tenant being targeted |
| LABELS= | Specifies any labels that should be automatically be applied upon installation. Labels must exist within the Tenant prior to installation or they will be ignored. Labels can be specified using the full name or the abbreviation and multiple labels can be selected by seperating with a "+" i.e. LABELS="label1+label2" |
| ACCEPTALL= | Allows EULA acceptance if set to "YES" |
| /l*v | Sets the output file for installation logs |
Flags For Custom Install Location
MsiExec defaults to using the C: drive. If you need to specify another drive/location then add both of the following flags to the command:
TARGETDIR="<Drive>" INSTALLDIR="<Installation Folder Path>"


Example: TARGETDIR="D:\" INSTALLDIR="D:\ProgramFiles\Senteon\Agent"
Steps
1) Download/transfer SenteonAgent.msi onto the endpoint you want to manage.
2) Using Administrator PowerShell or a Remote CLI session with a user that has Administrator privileges, run the following install command:
msiexec /i "<path>\SenteonAgent.msi" /quiet ORGANIZATION="<Organization ID>" TENANT="<Tenant ID>" REGISTRATIONCODE="<Registration Code>" ACCEPTALL=YES /l*v "C:\Windows\Temp\SenteonInstall.log"
Post-Install
After the installation is complete, the "Senteon Agent" service will be running on the endpoint. This service is configured to automatically restart if the computer is rebooted.
Next Steps
The next step is to configure Senteon Agents to implement and manage your hardened settings. Continue to Guided Setup.